# Getting started
!!!warning
Prefer using the [@workleap/telemetry](../../introduction/getting-started.md) umbrella package over this standalone library.
!!!
While we recommend using the `@workleap/telemetry` umbrella package, Workleap's LogRocket instrumentation can also be used as a standalone [@worleap/honeycomb](https://www.npmjs.com/package/@workleap/honeycomb) package.
To set it up, follow these steps :point_down:
## Install the packages
First, open a terminal at the root of the application and install the following packages:
```bash
pnpm add @workleap/honeycomb @opentelemetry/api
```
## Register instrumentation
Then, update the application bootstrapping code to register Honeycomb instrumentation using the [registerHoneycombInstrumentation](./reference.md#registerhoneycombinstrumentation) function:
```tsx !#6-9,15,17 index.tsx
import { registerHoneycombInstrumentation, HoneycombInstrumentationProvider, createTelemetryContext } from "@workleap/honeycomb/react";
import { StrictMode } from "react";
import { createRoot } from "react-dom/client";
import { App } from "./App.tsx";
const client = registerHoneycombInstrumentation("sample", "my-app", [/.+/g,], {
proxy: "https://sample-proxy",
telemetryContext: createTelemetryContext()
});
const root = createRoot(document.getElementById("root")!);
root.render(
);
```
!!!warning
Avoid using `/.+/g,` in production, as it could expose customer data to third parties. Instead, ensure you specify values that accurately matches your application's backend URLs.
!!!
!!!warning
We recommend using an [OpenTelemetry collector](https://docs.honeycomb.io/send-data/opentelemetry/collector/) with an authenticated proxy over an ingestion [API key](https://docs.honeycomb.io/get-started/configure/environments/manage-api-keys/#create-api-key), as API keys can expose Workleap to potential attacks.
!!!
## Set custom user attributes
Most applications need to set custom attributes about the current user environment on all traces. To help with that, [HoneycombInstrumentationClient](./reference.md#honeycombinstrumentationclient) expose the [setGlobalSpanAttributes](./reference.md#methods) method:
```ts !#5-7
import { useHoneycombInstrumentationClient } from "@workleap/honeycomb/react";
const client = useHoneycombInstrumentationClient();
client.setGlobalSpanAttributes({
"app.user_id": "123"
});
```
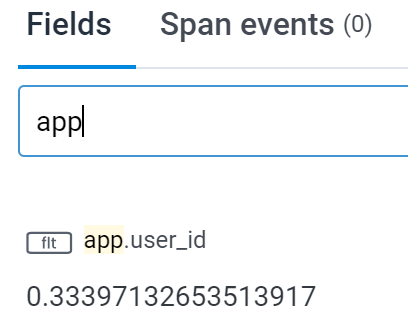
Now, every trace recorded after the execution of `setGlobalSpanAttributes` will include the custom attribute `app.user_id`:
:::align-image-left
{width=204 height=161}
:::
## Integrate with LogRocket
Starting with version `7.0`, attaching LogRocket session replays to Honeycomb traces requires providing a `LogRocketInstrumentationClient` to the registration function:
```tsx !#7,12
import { registerHoneycombInstrumentation, HoneycombInstrumentationProvider, createTelemetryContext } from "@workleap/honeycomb/react";
import { registerLogRocketInstrumentation } from "@workleap/logrocket/react";
import { StrictMode } from "react";
import { createRoot } from "react-dom/client";
import { App } from "./App.tsx";
const logRocketInstrumentationClient = registerLogRocketInstrumentation("app-id");
const honeycombInstrumentationClient = registerHoneycombInstrumentation("sample", "my-app", [/.+/g,], {
proxy: "https://sample-proxy",
telemetryContext: createTelemetryContext(),
logRocketInstrumentationClient
});
const root = createRoot(document.getElementById("root")!);
root.render(
);
```
## Custom traces
Applications are expected to use the [OpenTelemetry API](https://docs.honeycomb.io/send-data/javascript-browser/honeycomb-distribution/#add-custom-instrumentation) to send custom traces to Honeycomb:
```tsx !#4,9-10 src/Page.tsx
import { useEffect } from "react";
import { trace } from "@opentelemetry/api";
const tracer = trace.getTracer("sample");
export function Page() {
useEffect(() => {
// OK, this is a pretty bad example.
const span = tracer.startSpan("sample-span");
span.end();
}, []);
return (
Hello from a page!
);
}
```
## Try it :rocket:
Start the application in a development environment using the `dev` script. Render a page, then navigate to your [Honeycomb](https://ui.honeycomb.io/) instance. Go to the "Query" page and type `name = HTTP GET` into the "Where" input. Run the query, select the "Traces" tab at the bottom of the page and view the detail of a trace. You should view information about the request.
### Troubleshoot issues
If you are experiencing issues with this guide:
- Set the [verbose](./reference.md#verbose-mode) predefined option to `true`.
- Open the [DevTools](https://developer.chrome.com/docs/devtools/) console. Look for logs starting with `[honeycomb]`.
- You should also see a log entry for every Honeycomb traces.
- `honeycombio/opentelemetry-web: Honeycomb link: https://ui.honeycomb.io/...`
- Refer to the sample on [GitHub](https://github.com/workleap/wl-telemetry/tree/main/samples/honeycomb).